Amazon Lookout for Vision – New ML Service Simplifies Defect Detection for Manufacturing
Today, I’m excited to announce Amazon Lookout for Vision, a new machine learning (ML) service that helps customers in industrial environments to detect visual defects on production units and equipment in an easy and cost-effective way.
Can you spot the circuit board with the defect in these images?

Maybe you can if you are familiar with circuit boards, but I have to say that it took me a while to discover the error. Humans, when properly trained and are well rested, are great at finding anomalies in a set of objects. However, when they are tired or not properly trained – like me in this example – they can be slow, prone to errors and inconsistent.
That’s why many companies use machine vision technologies to detect anomalies. However, these technologies need to be calibrated with controlled lighting and camera viewpoints. In addition, you need to specify hard-coded rules that define what is a defect and what is not, making the technologies very specialized and complex to build.
Lookout for Vision is a new machine learning service that helps increase industrial product quality and reduce operational costs by automating visual inspection of product defects across production processes. Lookout for Vision uses deep learning models to replace hard-coded rules and handles the differences in camera angle, lighting and other challenges that arise from the operational environment. With Lookout for Vision, you can reduce the need for carefully controlled environments.
Using Lookout for Vision, you can detect damages to manufactured parts, identify missing components or parts, and uncover underlying process-related issues in your manufacturing lines.
How to Get Started With Lookout for Vision
The first thing I want to mention is that to use Lookout for Vision, you don’t need to be a machine learning expert. Lookout for Vision is a fully managed service and comes with anomaly detection models that can be optimized for your use case and your data.
There are several steps for using Lookout for Vision. The first is preparing the dataset, which includes creating a dataset of images and adding labels to the images. Then, Lookout for Vision uses this dataset to automatically train the ML model that learns to detect anomalies in your product. The final part is using the model in production. You can keep evaluating the performance of your trained model and improve it at any time using tools that Lookout for Vision provides.

Preparing the Data
To get started with the model, you first need a set of images of your product. For better results, include images with normal (no defects) and anomalous content (includes defects). To get started with training, you will need at least 20 normal images and 10 anomalous images.
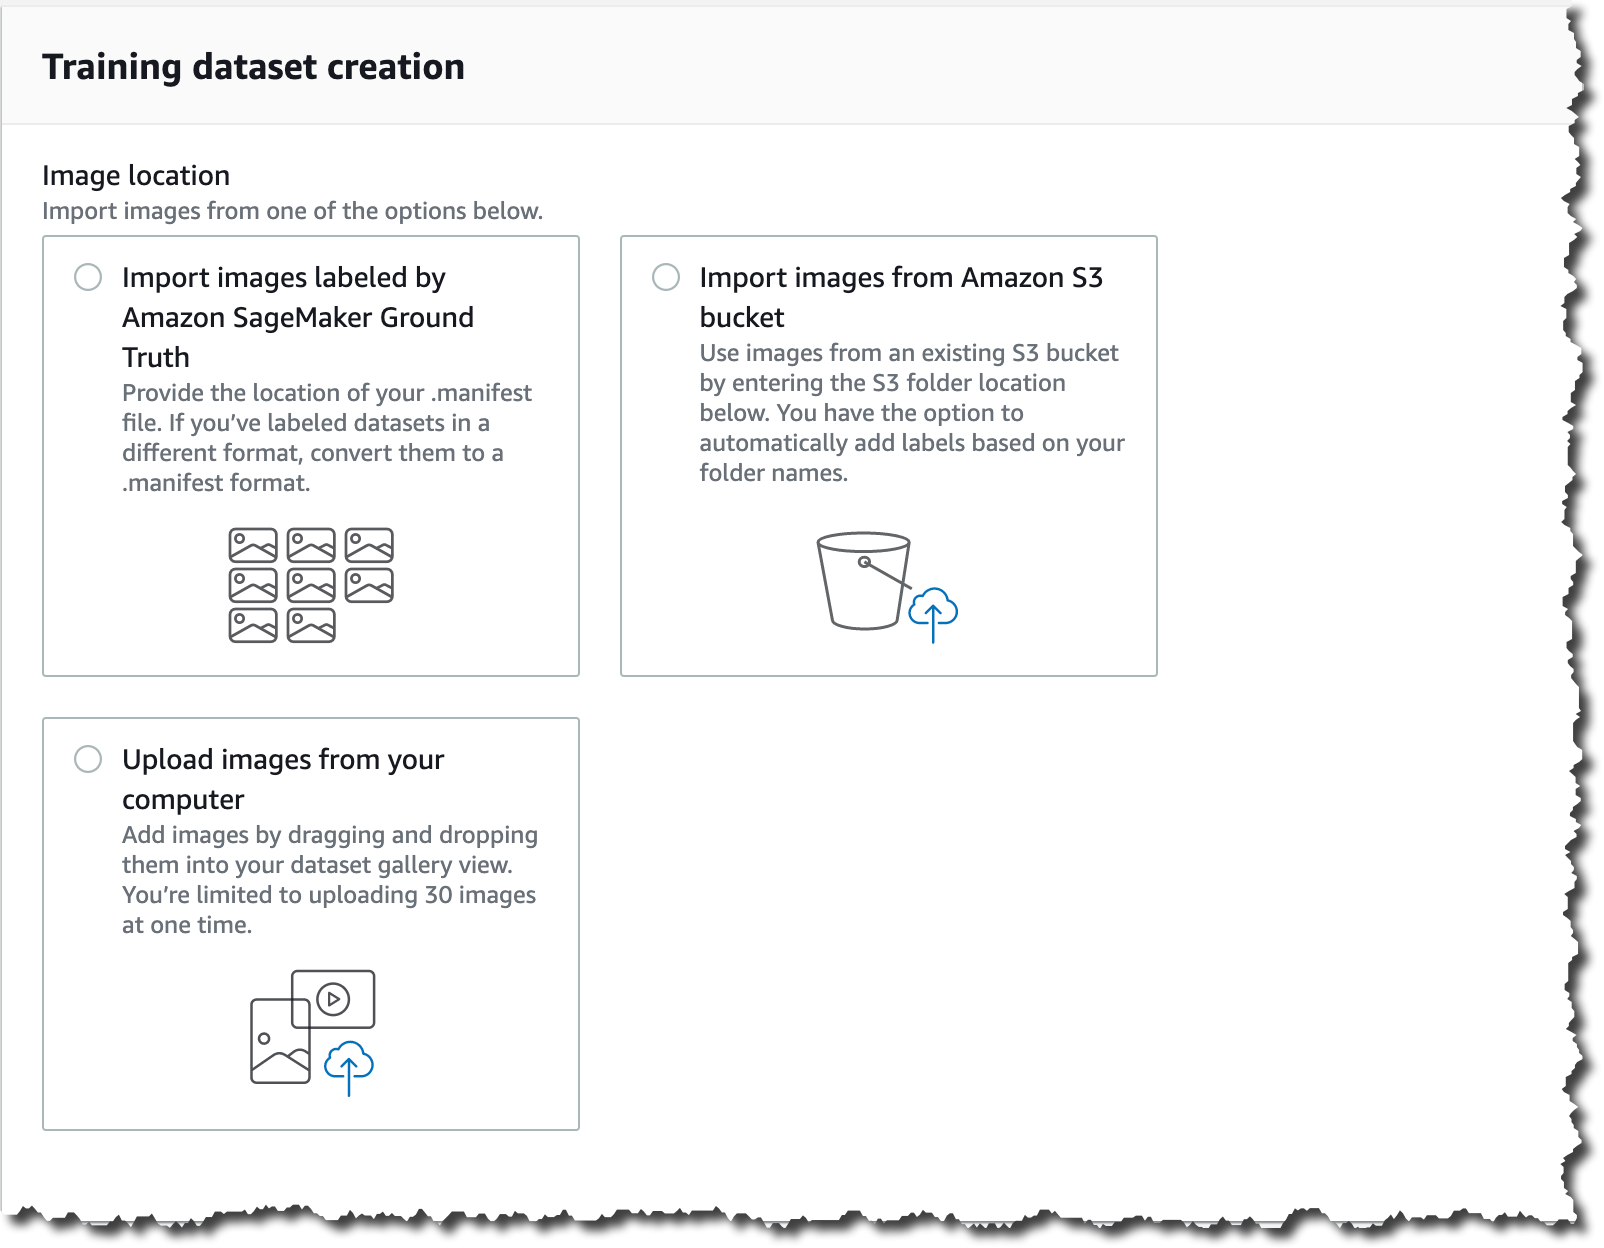
There are many ways of importing images into Lookout for Vision from the AWS Management Console: You can provide manifests for annotated images using the Amazon SageMaker Ground Truth service, provide images from an S3 bucket or upload directly from your computer.
After you upload the images, you need to add labels to classify the images in your dataset as normal or anomalous. Labeling is a very important step, as this is the key information that Lookout for Vision uses to train the model for your use case.
For this demo, I import the images from an S3 bucket. If you’ve organized the images in your S3 bucket by folder name (/anomaly/01.jpeg), Lookout for Vision will automatically import the folder structure into corresponding labels.

Training the Model
When our dataset is ready, we need to train our model with it. The training button is enabled once you have the minimum number of labeled images: 20 normal and 10 anomalous.
Depending on the size of the dataset, training may take a while to complete: for me, it took around an hour to train the model with 100 images. Note that you will begin incurring costs when Lookout for Vision starts to actually train the model. After training is complete, your model is ready to detect anomalies in new images.

Evaluating the Model
There are a couple of ways to evaluate whether your model is ready to be deployed to production. The first is to review the performance metrics of the model and the second is to run some production–like tests that will help you to verify if the model is ready to be deployed.
There are three main performance metrics: precision, recall and the F1 score. Precision measures the percentage of times the model prediction is correct and recall measures the percentage of true defects the model identified. F1 score is used to determine the model performance metric.

If you want to run some production-like tests to verify if your model is ready, use the run trial detection feature. This will enable you to run your Lookout for Vision model and predict anomalies on new images. You can further improve the model by manually verifying the results and adding new training images.

I used the three images that appear at the beginning of this post for my trial detection. The trial detection job ran for 15-20 minutes, and after that Lookout for Vision used the trained model to classify the images into “Normal” and “Anomaly.” When Lookout for Vision finalizes the trial detection job, you can verify the results as correct or incorrect, and add this images to the dataset.

Using the Model in Production
To use Lookout for Vision, you need to integrate the AWS SDKs or CLI in the systems that are processing the images of the products in the manufacturing line, and internet connectivity is required for this to work. The first thing you need to do is to start the model. When using Lookout for Vision, you are billed for the time your model is running and making inferences. For example, if you start your model at 8 a.m. and stop it at 5 p.m., you will be billed for 9 hours.
# Example CLI
aws lookoutvision start-model
--project-name circuitBoard
--model-version 1
--additional-output-config "Bucket=<OUTPUT_BUCKET>,Prefix=<PREFIX_KEY>"
--min-anomaly-detection-units 10

# Example response
{ "status" : "STARTING_HOSTING" }
When your model is ready, you can call the detect-anomalies API from Lookout for Vision.
# Example CLI
aws lookoutvision detect-anomalies
--project-name circuitBoard
--model-version 1
And this API will return a JSON response that shows if the image is an anomaly or not, along with the confidence level of that prediction.
{
    "DetectAnomalyResult": {
        "Source": {
            "Type": "direct"
        },
        "IsAnomalous": true,
        "Confidence": 0.97
    }
}
When you are done with detecting anomalies for the day, use the stop-model API. In the Lookout for Vision service console you can find code snippets on how to use these APIs.
When you are using Lookout for Vision in production, you’ll find a dashboard that helps you to sort and track the production lines by most defective line, line with the most recent defects, and the line with the highest anomaly ratio.
Available Today
Lookout for Vision is available in all AWS Regions.
To get started with Amazon Lookout for Vision, visit the service page today.
— Marcia


Source: AWS News